
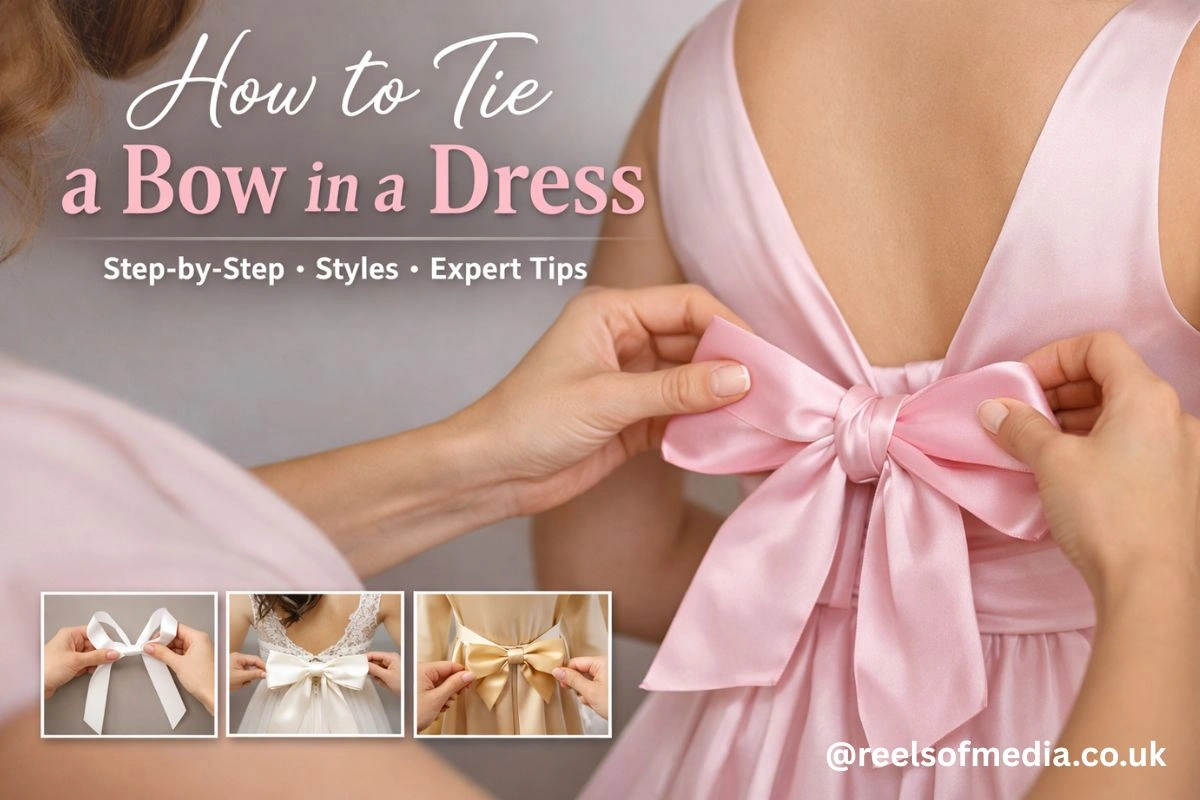
Tying a bow in a dress is a practical skill that directly affects fit, comfort, and overall appearance. Whether the bow is functional or decorative, knowing how to tie a bow in a dress correctly helps ensure the garment sits as intended and stays secure during wear. Small details like tension, symmetry, and placement can make the difference between a polished look and a distracting adjustment issue.
For everyday dresses, formal gowns, and occasion wear alike, understanding how to tie a bow in a dress saves time and avoids common mistakes such as slipping knots or uneven loops. This guidance focuses on clear, repeatable methods used in real settings, with attention to fabric behavior, body alignment, and practical adjustments that professionals rely on when dressing efficiently and accurately.
What Does “Tying a Bow in a Dress” Mean?
Tying a bow in a dress means fastening fabric ties, ribbons, or sashes into a secure and balanced knot that shapes the dress and completes its design.
It serves both structural and visual purposes, depending on the dress style.
Types of dresses that use bows
Many dress styles rely on bows as part of their construction or styling.
-
Wrap dresses that use waist ties
-
Formal gowns with back or side sashes
-
Casual dresses with decorative ribbon details
-
Children’s and bridesmaid dresses with adjustable fits


Common bow placements on dresses
Bows are placed where fit, balance, or visual focus is needed.
-
Back of the waist for adjustment
-
Front center for decorative emphasis
-
Side waist for asymmetrical styling
-
Shoulder or neckline for accent details
When a bow is functional vs decorative
A functional bow controls fit, while a decorative bow focuses on appearance.
-
Functional bows tighten or loosen the dress
-
Decorative bows are pre-shaped or lightly secured
-
Some designs combine both roles
-
Knowing the purpose guides how tight the bow should be
How Tying a Bow in a Dress Works
Tying a bow works by evenly distributing tension through loops and tails to hold fabric in place without slipping.
Balance and fabric behavior determine the final result.
Understanding ribbons, sashes, and fabric ties
Dress bows use different materials that behave differently under tension.
-
Ribbons are smooth and require extra security
-
Sashes are wider and distribute pressure evenly
-
Fabric ties stretch or compress based on weave
-
Thickness affects knot stability
How tension and symmetry affect the bow
Even tension creates a clean and stable bow.
-
Uneven pulling causes lopsided loops
-
Too much tension flattens the bow
-
Too little tension allows slipping
-
Symmetry keeps the bow visually balanced
Why fabric type changes the technique
Fabric texture directly affects how the bow holds.
-
Satin slips and needs firmer knots
-
Cotton grips better and holds shape
-
Chiffon requires gentle handling
-
Stiff fabrics need wider loops
Basic Method to Tie a Bow in a Dress
The basic method uses a controlled knot with evenly sized loops and secure tails.
This approach works for most dresses.
Preparing the dress ties correctly
Proper preparation prevents uneven bows and weak knots.
-
Lay ties flat without twisting
-
Match both ends in length
-
Smooth fabric before tying
-
Center the ties at the intended position
Creating balanced loops
Balanced loops keep the bow neat and proportional.
-
Form two loops of equal size
-
Hold loops firmly at the base
-
Cross loops without twisting
-
Keep tension consistent on both sides
Securing the knot so it stays in place
A stable knot prevents loosening during movement.
-
Pull loops gently but firmly
-
Tighten the center knot evenly
-
Adjust tails after securing
-
Avoid over-pulling at the final step
How to Tie a Bow on the Back of a Dress
Tying a bow on the back requires controlled positioning and measured adjustments.
It is common in formal and fitted dresses.
Positioning the bow without assistance
You can tie a back bow alone with the right setup.
-
Use a mirror or camera view
-
Pre-center the sash before tying
-
Tie slightly to the side, then slide to center
-
Check alignment visually
Adjusting length for back bows
Tail length affects both comfort and appearance.
-
Keep tails equal before tightening
-
Shorten tails for fitted dresses
-
Allow longer tails for formal gowns
-
Re-adjust after standing upright
Preventing twisting and slipping
Back bows are prone to movement without proper control.
-
Keep fabric flat while tying
-
Tighten slowly and evenly
-
Use light friction aids if needed
-
Re-check after walking
How to Tie a Bow on the Front or Waist
Front and waist bows focus on symmetry and body alignment.
They are easier to adjust and more visible.
Centering the bow on the body
Proper centering creates a polished look.
-
Align the knot with the body’s midline
-
Adjust while facing a mirror
-
Secure before final tightening
-
Re-check after movement
Choosing bow size for body shape
Bow size should match proportions, not overpower them.
-
Smaller bows suit fitted silhouettes
-
Medium bows balance A-line dresses
-
Large bows work with structured gowns
-
Avoid oversized bows on lightweight fabrics
Styling the waist bow neatly
Neat waist bows support the dress shape.
-
Keep loops slightly upright
-
Smooth tails downward
-
Avoid bulky knots
-
Maintain consistent tension
Different Bow Styles Used in Dresses
Dress bows vary in structure, size, and purpose.
Style choice affects both fit and appearance.
Classic loop bow
The classic loop bow is the most common and versatile style.
-
Two symmetrical loops
-
Balanced tails
-
Suitable for most dresses
-
Easy to adjust
Flat fashion bow
Flat bows sit close to the dress surface.
-
Minimal volume
-
Decorative focus
-
Often pre-shaped
-
Common in modern designs
Oversized and statement bows
Statement bows are designed to stand out.
-
Larger loops and tails
-
Often decorative rather than functional
-
Require strong anchoring
-
Best for structured fabrics
Why Properly Tying a Dress Bow Matters
A properly tied bow directly affects comfort, fit, and appearance.
Poor technique leads to instability and visual imbalance.
Impact on fit and comfort
Bow tension controls how the dress sits on the body.
-
Even tension prevents pressure points
-
Loose bows cause shifting
-
Tight bows restrict movement
-
Correct fit improves wearability
Visual balance and outfit appearance
A balanced bow completes the dress design.
-
Symmetry enhances proportions
-
Clean lines look intentional
-
Misaligned bows draw attention
-
Proper placement supports the silhouette
Avoiding wardrobe malfunctions
Secure bows reduce the risk of slipping or loosening.
-
Stable knots stay in place
-
Proper tension prevents sagging
-
Reduced need for readjustment
-
Increased confidence during wear
Benefits of Tying a Dress Bow Correctly
Correct bow tying improves both function and presentation.
It affects how the dress performs over time.
Improved dress structure and fit
The bow supports the intended dress shape.
-
Maintains waist definition
-
Keeps panels aligned
-
Prevents fabric shifting
-
Enhances tailoring
Enhanced overall styling
A clean bow elevates the entire outfit.
-
Looks deliberate and polished
-
Complements design details
-
Maintains visual consistency
-
Photographs well
Confidence and ease of movement
Secure bows reduce distraction during wear.
-
No constant re-adjusting
-
Comfortable movement
-
Predictable fit
-
Professional appearance
Best Practices for a Neat and Lasting Bow
Best practices focus on fabric behavior, balance, and final checks.
These steps improve durability.
Matching bow technique to fabric type
Different fabrics need different handling.
-
Smooth fabrics need firmer knots
-
Soft fabrics need gentle tension
-
Stiff fabrics need wider loops
-
Lightweight fabrics need support
Maintaining even loops and tails
Consistency keeps the bow clean.
-
Measure visually before tightening
-
Adjust loops before securing
-
Keep tails aligned
-
Re-balance after tying
Quick adjustments before wearing
Final checks prevent issues later.
-
Stand and move naturally
-
Smooth fabric around the knot
-
Confirm placement
-
Tighten slightly if needed
Common Mistakes When Tying a Bow in a Dress
Most bow issues come from uneven tension or poor placement.
These mistakes are easy to avoid with awareness.
Uneven loops or tails
Uneven elements disrupt balance.
-
Caused by uneven pulling
-
Visible in front-facing bows
-
Affects symmetry
-
Requires re-adjustment
Over-tightening or loose knots
Incorrect tension causes discomfort or instability.
-
Over-tightening flattens the bow
-
Loose knots slip over time
-
Both affect appearance
-
Balanced tension solves both
Incorrect placement on the dress
Placement errors change how the dress fits.
-
Too high alters proportions
-
Too low affects structure
-
Off-center draws attention
-
Proper alignment fixes this
Tools and Techniques That Make Bow-Tying Easier
Simple tools can improve accuracy and consistency.
They help with visibility and grip.
Using mirrors or assistance tools
Visibility improves placement and symmetry.
-
Full-length mirrors help alignment
-
Hand mirrors assist with back bows
-
Phone cameras offer quick checks
-
Better angles reduce errors
Fabric grips and fashion tape
Light support prevents slipping.
-
Double-sided fashion tape stabilizes knots
-
Fabric grips add friction
-
Temporary solutions work best
-
Avoid permanent adhesives
Practicing off the body first
Practice improves muscle memory.
-
Tie bows on a hanger
-
Learn tension control
-
Identify fabric behavior
-
Reduce errors when wearing
Step-by-Step Checklist Before Finalizing the Bow
A final checklist ensures the bow performs as intended.
It prevents last-minute issues.
Fit and alignment check
Confirm the dress sits correctly.
-
Check waist placement
-
Confirm knot position
-
Ensure even tension
-
Adjust if needed
Movement and comfort test
Test the bow under normal movement.
-
Walk and sit
-
Raise arms if needed
-
Watch for loosening
-
Re-tighten gently
Visual symmetry review
Final visual checks improve appearance.
-
Compare loop size
-
Align tails
-
Smooth fabric
-
Confirm balance
Comparing Bow-Tying Methods for Different Dress Types
Different dresses require different bow approaches.
One method does not fit all designs.
Formal dresses vs casual dresses
Formality changes bow expectations.
-
Formal dresses need structured bows
-
Casual dresses allow relaxed styles
-
Fabric choice differs
-
Security requirements vary
Long ribbon bows vs short ties
Length affects technique and appearance.
-
Long ribbons allow decorative tails
-
Short ties focus on function
-
Long bows need more control
-
Short bows need precise knots
Adjustable vs fixed bow designs
Design determines flexibility.
-
Adjustable bows control fit
-
Fixed bows focus on style
-
Adjustable designs need stronger knots
-
Fixed bows need alignment checks
FAQs
How tight should a bow on a dress be?
A bow should be tight enough to hold the dress securely without causing discomfort or restricting movement. You should be able to move freely without the bow loosening.
How do you keep a dress bow from coming undone?
Keeping the fabric flat, applying even tension, and tightening the knot gradually helps prevent slipping. For smooth fabrics, light fashion tape can add extra hold.
Can you tie a bow neatly without someone’s help?
Yes, using a mirror or phone camera makes it easier to center and adjust the bow, especially for back-tied dresses.
What is the easiest method for beginners learning how to tie a bow in a dress?
The classic loop bow is the easiest for beginners because it requires minimal steps, is easy to adjust, and works well with most dress fabrics.
Does fabric type affect how a bow should be tied?
Yes, smooth fabrics need firmer knots, while textured or cotton fabrics hold better with lighter tension, changing how the bow should be secured.